Monday, 16 July 2012

Summer Challenge Day 32 - Pink + Purple Mani

 I love this mani, it was simple and i think that's why I really like it


I started off with a base coat of OPI Kiss Me On The Tulips. Then using sticky tape on the diagonal I left the bottom half of my nail uncovered and painted on OPI Dutch 'Ya Just Love OPI?


Across the diagonal join I covered it with Bundle Monster Stamp Image from plate BM01


I absolutely love this OPI purple.  It's a really rich, deep purple with a gorgeous gold shimmer through it.  I thought it really made the pink creme pop!

Hope ya like :)

xxKaren

Next...
Day 33 - Sea Shells

Sunday, 15 July 2012

Summer Challenge Day 31 - Beach Towels

Today I bring you my interpretation of a colourful Beach Towel. I hope you like it


I started with a base coat of OPI Mod About You, which is a gorgeous baby pink.  I always think of pink marshmellows whenever I put it on :)


Then I applied the dots, alternating in colour


The colours I used in this design included:
OPI Mod About You (Base)
OPI No Room for the Blues
OPI Dating a Royal
OPI A Grape Fit!
OPI Alpine Snow

Let me know what you think.

xxKaren

Next...

Saturday, 14 July 2012

Summer Challenge Day 29 - Cricket anyone?

Hi everyone! I'm happy to present to you my cricket nail art manicure.  I was quiet (happily) surprised with the finished result of this one.  To be honest I was happy to let this one slip (pun not intended).  Then I had  light-bulb moment and this is what came together. 


I purchased one of these Sally Hansen Nail Art pens from Priceline and I can count how many times I've used it on one hand.  But when i do remember that I have it, it's actually a really handy tool to have.  I think I'm going to use this more often.


Using the nail art pen I was able to draw the wickets and bails precisely:


Sponged on some green for the lawn with OPI Uh-oh Roll Down the Windows and dotted some Balls using a doting tool and OPI Manicurist of Seville to reflect a ball going towards the wickets. On my pinky are the bails knocked off the stumps.


OPI Manicurist of Seville
OPI Uh-oh Roll Down the Windows
Maybelline Party Blue
Sally Hansen Nail Art Pen in White

Thanks for looking.  I hope you like this design. I thought it turned out pretty.  Well I'm glad I chose to do this challenge in the end <3

xx Karen

Next...
Day 30 - A pedicure *gasp!*

Friday, 13 July 2012

Summer Challenge Day 28 - Summer Chevrons

Hi ya lovelies.  I want to start off by saying that this is actual my second attempt at this design.  The first... not so pretty.  Needed to sleep on it, then came up with this one.  I really like the idea behind it. I used a nail tip design and stamped them twice meeting at the top of my nail to form a "V" for the chevron.  It's sort of a variation to a French Tip.  What do you think?


Here is the image I used and the first half to the chevron.


Here is the final design with the other side of the chevron added.  So what do you think?
The base colour used was Ulta3 in Watermelon which I think is a beautiful summer peach colour, maybe they should have called it Peach...  The image is from Bundle Monster plate BM18


Thanks for stopping by. 
Please leave a comment down below, I love hearing your thoughts and comments.

xx Karen

Next...

Thursday, 12 July 2012

Summer Challenge Day 27 - Independence Day

Happy (belated) 4th of July everyone!!

I finally delivered a design and finish I was happy with, hope you like it too :)
My last two posts weren't my best work and I toyed with the idea of leaving them out, but thought I needed to share, I guess what I'm trying to show is that no one is perfect.  Hope that made you feel better about your failed nail art attempts.  Trust me when I say, you're not alone.

Anyway moving on... here it is.  My version of Stars and Stripes for Independence Day.


I used OPI Dating a Royal on my thumb and pointer finger, OPI Alpine snow on the rest.  I stamped the red chevron lines using Bundle Monster plate BM-201, the stars from BM-14.  The USA star on my thumb was from a plate I got as a freebie when bought my plastic scrapper, it has no brand on it but it has m73 on it.


One last time.  Happy Birthday America.


Thanks for stopping by, see you next time

xx Karen

Next...

Wednesday, 11 July 2012

Summer Challenge Day 26 - Euro 2012 Football (Soccer!)

Hey Everyone.  Let me warn you now, not having much lunch lately with the Challenge, this one started out with so much potential but quickly all went down hill.  I had a really good idea of a flaming soccer ball... what I got was a globby mess.  But if you can look past that, I actually don't mind the rest of the design.  I was going for a impressionist feel for the green field and lines.  Then the flaming soccer ball glob of gooey mess... It also reminds me how much I really need to get another green polish.


Colours used was Ulta3 Lagoon and Bundle Monster Image plates BM-312 (flaming ball) and BM-316 (lines)


I hope you can see what I was trying to achieve here.
Thanks for looking, see you next time.  I promise the next one is heaps better!


xx Karen

Next...
Day 28 - Independence Day (Stars & Stripes)


Hi again,  just thought i needed to add a disclaimer here... I toyed with the idea of leaving these last two posts out.  I didn't like them one bit, but felt I still needed to share them.  I guess what I'm trying to show (and using my own fails as an example) that no one is perfect.  It's all part of the fun of nail art.
xKaren

Summer Challenge Day 25 - Summer Water Marble FAIL!

Oh my goodness, please help me.

When it comes to Water Marbling I clearly am doing something wrong, I was dreading this one and my fears came true.  I totally, and royally stuffed this one up.  I'm only going to show one photo and ONE photo ONLY! only for the benefit of the Challenge and to prove that I did give it a go. I'm not afraid to show you my fails, I am human after all.

I warned you in my last post that Water Marbling and me are NOT FRIENDS.  Here is the proof.


This would be my 4th attempt at water marbling and I'm just not getting it right or even close. Now am I seeing a sign of improvement, which I find terribly frustrating.

Believe when I say that I've YouTubed and searched high and low.  I followed all the tips and guides how to produce the beautiful water marble affect.  However it's just not meant to be between me and the water marbling, we're just not seeing eye to eye right now.  However, I haven't given up, it's just not right for me right now...

So without further adu, I really don't want to dwell on this one anymore than I have to... so moving on to the next theme please...

Next...

xx Karen


This is me giving up!


Tuesday, 10 July 2012

Summer Challenge Day 24 - Under the Stars (Galaxy Manicure)

I follow a lovely girl on YouTube and you've probably seen or heard of her yourself, MissJenFabulous.  Anyway I saw her do a tutorial on a Galaxy Nails and fell in love with this mani straight away.  When I saw the theme for Under the Stars, straight away thought of this and how perfect it would be.


Unfortunately the camera didn't pick up the sparkles of the galaxy as I had hoped.  I used OPI's Servin' Up Sparkle.  Anyone who's used this will know it's a very cool glitter polish with large and small speckles.


Starting with a base coat of plain black (got it from Sportsgirl) I then sponged on some OPI I Vant To Be A-Lone Star, followed by OPI Ski Teal We drop, OPI Suzi Says Feng Shui, then finishing with OPI A Grape Fit! To pull all these colours together and smooth out the sponging did a final coat of OPI Servin' Up Sparkle.

I hope you like it.  It was fun to do and if you get a chance to watch the YouTube link above by MissJenFabulous is a fantastic YouTuber on fashion, makeup and nail tutorials.

Thanks for stopping by.  See you next time.

xx Karen


Next...
(Warning.. Water Marbling and me are not friends!)


Monday, 9 July 2012

Summer Challenge Day 23 - Blue, Aqua, Green

I really liked how today's Blue Aqua and Green theme turned out.  Better than what I had imagined in my head.  And I was quite hesitant to take it off.  This used the simple method of dotting with the help of a handy dotting tool.  I think I'll definitely be re-creating this one another day.  Hope you liked it too :)
 

Colours Used:
OPI - Thanks A Windmillion (green base)
OPI - Suzi Says Feng Shui (aqua dots)
OPI - Dating A Royal (dark blue dots)


OPI - Thanks a Windmillion

Thanks for looking.  See you next time


xx Karen

Next...
Day 24 - Under The Stars
(Galaxy / Universe Mani)


Sunday, 8 July 2012

Summer Challenge Day 22 - Wimbledon

Hello Everyone.  Wimbledon finals are already here! oh my I'm soooo far behind on this summer challenge.  Despite that I'm still really enjoying the challenge,  I just need to work on my time management.  So please, I want to apologise to all of you who are following the challenge and every now and then this person (me...) pops up an old theme.  Sorry.

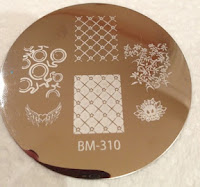
Now the Wimbledon tennis tournament traditionally have green and purple, and the players traditionally wear white.  So I've used the darkest green i have, OPI's Mermaids Tears and paired that with OPI's A Grape Fit! I thought these two colours (although not the same as the dark purple and green) complimented very well.   And finished the design off with Bundle Monster image plate BM-310 from the new set.  I thought this design reflected the Classique English theme.

Anyway, enough talk here it is...
Colours used:
OPI Mermaids Tears (green)
OPI A Grape Fit! (purple)
Image Plate BM-310


Well I hope you like this design.  Looking forward to the next one.

xx Karen

Next...
 

Thursday, 5 July 2012

999 Visitors!

To celebrate almost 1000 visitors to my blog a very big...

THANK YOU!

It's fills me with so much warmth and love to know that others out there enjoy popping in and having a look and a read about something I enjoy doing.  I wanted to share this with others alike.  This makes me feel very special, I thank you for that.

So who's going to be number 1000?? The anticipation is killing me, been watching my dashboard all day to see it click over. hehe.

Again I'd like to say Thanks to Everybody!


xxKaren

Wednesday, 4 July 2012

NOTD - Dots n' Strips

Hello Lovelies.

Today wanted to share with you my NOTD.  I bought this bottle of Dots n' Strips from SparklesbyJulie on Etsy and it arrived yesterday, so of course I'm already wearing it today :P


I used about 1 1/2 coats of Dots & Strips over the top of Two Coats of OPI French Quarter For Your Thoughts.  Finished with a coat of Seche Vite


This is such a fun as a top coat, and can be used over most base colours.  I chose a grey base because I'm wearing my grey chevron kilt/skirt and it matches perfectly.

Am I the only one that dresses according to my nail polish? hehe

Well I hope you like the end look.

xx Karen

Tuesday, 3 July 2012

My New Carry Case - Picture Heavy

Hey Everyone.  I just had to share my new carry case you.  It finally arrived, didn't take long for shipment, so when it arrive in less than 2 weeks from the states I was very happy considering the size of the package.  Overall I think it was a good buy and investment and sharing my find with you.  If you're interested it also comes in Pink, or Zebra print :)


Took some photos before I loaded her up with my stuff.  And how I have up til now stored my polishes.

I go around do friends and families nails and needed something that was more user friendly than an old wine box my sister gave me, or a shoe box.  Found this on eBay and said to myself, enough, just buy it already! The case itself was $75, but what killed me the most was the postage to Australia... another $50 on top of that (ouch!) and that's why I'd hesitated for so long.

So here she finally is and I'm glad I bit the bullet and did it.  Totally worth it and now I can carry my polishes with me where ever I go with so much more ease and professiolism :-)


The first level has clear perspex and this is where I keep my pretties.  With the foam, it will hold 60 bottles, I took these out and can fit ALL my OPI's in there. Last count I had over 70.

The second level is a slide out draw with a little hatch to keep it safely closed, I keep my stamping stuff in here, nail files and other odd bits and pieces.

The bottom layer has removal dividers, so you can arrange them to best fit.  I've used this level for my bases, top coats and other polishes that don't necessarily need to be on display on the first layer.

Here are my OPI's in the wine box:


And the other polishes...
 I stored these in a straw box lined with linen I got from a craft shop, there's two layers of polish in here 


My Stamping stuff I keep in my Harrods Bag, here they are out of the bag...


Here are the products I got from my beauty course for manicures and pedicures.  This is the old shoebox I used to keep my OPI's in before the OPI's out grew the shoebox...


This is her all loaded up!

Top Compartment - The OPI's
  
Middle Draw - Stamping


Bottom Compartment, stuff

Well I've been wanting to do this for a while.  It's such a great storage unit.  Especially great for travelling and carting this stuff around with a lot more ease.

Hope you found this helpful, or just interesting.

xx Karen