Showing posts with label Nail Art. Show all posts

Saturday, 4 July 2015

#OMD3 - Day 2 - Peach

Day 2 of the OMD3 2015 Nail Challenge, I was going to do an orange gradient.. but that's orange... So as I was going through my polish stash, I came across this little beauty by Picture Polish.  It fit the bill perfectly for this days theme.


Ingredients:

  • Base:  OPI Ridge Filler
  • Gradient:  
    • OPI Alpine Snow
    • Picture Polish Peaches n' Cream
  • Silver:  OPI Push and Shove
  •  Top Coat:  Poshé


Tuesday, 3 February 2015

Freehand Teddy Bears Nail Art (inspired by Tartofraises)

Hi Lovelies,

This is a manicure I've been wanting to do for a while and I finally found the time and COURAGE to give it a go.  If you haven't discovered Tartofraises yet, go over to her YouTube or Blog and you will be amazed!  She is the queen of One Stroke nail art and her designs are so beautiful and delicate.

I came across her design of those cute scruffy Ourson Teddy Bears.  She made it look easy enough that I thought even I could do that. So I got out my acrylic paints out, some basic paint brushes and gave it a good go, even tried painting with my left hand!

I give all the credit to Tartofraises and I hope i gave her some justice.  I hope you like my attempt at re-creating this cute design, I sure did have fun trying to re-create it.


Materials Used:
Base Coat: Orly Bonder
Base: China Glaze Pelican Grey
Art Work: Acrylic Paints
Top Coat: Poshè

Tartofraises Inspiration for this creation:
YouTube Post here
Blog Post here

Ourson Teddy Bear

Thanks for stopping by

Monday, 21 April 2014

Epic Nail - Nail Transfer Foils Review


Hello lovelies,

I'm excited to be back with another review.  Not just to share with you these amazing nail product, but I've just come back from a holiday in Italy. Going away always makes me appreciate home, and I sadly realised how much I missed my nail polishes!! I limited myself to just two colours while I was away. I think that was very restrained of me.

Anyway... Back to the review...

I have had yet another opportunity to do a review for Epic Nail, this time transfer foils.


So here is the end result. This is All Laced Up,  I used a base coat of ColorClub Worth The Risque. 
Each Roll of foil is 4cm x 100cm.  Comes packed with a cardboard inner and a transparent hard plastic storage tube.  Epic Nail have some pretty awesome kits or foil packs which come with the glue you need and 6 different foil designs which in my opinion is good value for money.  Or you could just get a single roll. Also have look at their shellacs, I did a review a little while ago (here). 

Epic Nail regularly have specials so it is worth subscribing to their email list.

All Laced Up
(buy online here)


To be honest, at first I didn't like foils, it's true.  I couldn't quite work out if it was actually as difficult as I was finding it be OR I just wasn't getting it.  I had almost given up trying after many failed attempts.  Sometimes it's best to put things aside and come back to it when you're ready, I'd had enough for one day and I wasn't getting anywhere anyway.


Weeks past and I saw a fellow nail art YouTube-r I follow [Miss80Million], she made transferring the foils look so easy and I was inspired to try once again.  Her video was a basic introduction to transferring foils, this is where I needed to pick up from where I had last left off.  I needed to go right back to step one.

So I did some more research about common problems others faced when using transfer foils. I was relieved knowing I wasn't alone!  I will also note here, I'm still trying to grow the courage to attempt marbling once more...

So watching Miss80Million's video gave me the motivation to try again. And they worked! It actually worked! By the end of it I was doing two even three fingers at a time. The biggest tip I learnt was to WAIT. At least 5-10mins for the glue to dry before applying the transfer foil. 


Tips & Lessons Learnt:
In no particular order of importance, here is a list of things I discovered myself and also from what learnt from others in my search.
  1. Use a base colour - Needs to be completely dry
    Choose a colour that closely matches the foil.  Because the foil may not cover the entire nail perfectly, this covers up any untidy edges.  One coat is probably all you need.  Think of it as a clean edge manicure insurance policy.

  2. Patience, you need to WAIT!!!
    Some packages say to wait 3mins or until the glue "goes clear".  This is what I did first time... and it never worked. I found many other nail enthusiast said to wait, and then wait some more, sometimes up to 15mins.  And they were right girls and boys.  I painted 2 nails, watched some TV then came back about 10mins later and it worked.  This was my breakthrough moment!
  3. Use a Cotton-Bud (or Q-Tip)
    Orange sticks could pierce the plastic sheet of the transfer foil.  Or you could use your fingers, but you seem to get more even pressure and control using a Cotton-Bud to smooth out the bumps and bubbles.
  4. Place carefully
    Take the time to place the foil properly (remember there is no rush, the glue will be better the longer you wait anyway).  Once the foil touches your nail, you can't 
    re-position it! This can be an issue if the foil is a pattern.
  5. Don't forget Top Coat!
    It's so important to seal in the foil, not only makes it last longer, but it's so pretty and shinny too.

    As a suggestion, perhaps apply a fast drying top coat after your base colour, just in case you stuff it up.  With nail polish remover you can remove the foil layer without damaging your base underneath.  This way you save yourself painting you nails from scratch again, and attempt to re-foil (take-two).

The finished results I think are amazing. I was too embarrassed to take pictures of my first attempts, but in reflection I should have, just so I can show you what a big difference following these handy tips made.


Have you tried foils before? What was your first experience like? What do you find helped? 


xx Karen xx


Thursday, 19 December 2013

Plum Blossom Water Decals

Hi lovelies!

I had a wonderful weekend and the weather is FINALLY starting to warm up here in Melbourne (40degC). Summer is finally here.

To celebrate the warmer weather I was going through my water decals, which I don't think I've actually made a post on yet.


I love this combination. I used two coats of OPI My Very First Knockwurst.  Waited for this to completely dry then applied the blossom decals I got from kkcenterhk.com.  They have such a fantastic selection of water decals. I love the more delicate decals, like these or lace patterns as a general rule of thumb.

source

The great thing about this mani is it can still be "office appropriate".  Well that's I what I think anyway :)

Thanks for passing by
As always love, xx Karen

Wednesday, 21 August 2013

Leopard Spots & Gradients

Hi Loverlies!!

I have a mani here today that was inspired by a fellow blogger and I would like to acknowledge them but I can't for the sake of me remember where :( I saw this so long ago, so if you know or recall a similar mani let me know!  However, from memory it didn't turn out as I had remembered, I still liked the finished look.


I used OPI Mimosas for Mr. & Mrs, the black was a standard black polish I bought from Sportsgirl.  I used Stamping Plate F2 which I got online.  There a number of leopard print stamping plates out there now and they kind of all very as to how close the spots are together.  This I found just worked.


Keeping it short and sweet, hoped you liked this mani, and thanks for popping in :)

xxKaren


Saturday, 14 July 2012

Summer Challenge Day 29 - Cricket anyone?

Hi everyone! I'm happy to present to you my cricket nail art manicure.  I was quiet (happily) surprised with the finished result of this one.  To be honest I was happy to let this one slip (pun not intended).  Then I had  light-bulb moment and this is what came together. 


I purchased one of these Sally Hansen Nail Art pens from Priceline and I can count how many times I've used it on one hand.  But when i do remember that I have it, it's actually a really handy tool to have.  I think I'm going to use this more often.


Using the nail art pen I was able to draw the wickets and bails precisely:


Sponged on some green for the lawn with OPI Uh-oh Roll Down the Windows and dotted some Balls using a doting tool and OPI Manicurist of Seville to reflect a ball going towards the wickets. On my pinky are the bails knocked off the stumps.


OPI Manicurist of Seville
OPI Uh-oh Roll Down the Windows
Maybelline Party Blue
Sally Hansen Nail Art Pen in White

Thanks for looking.  I hope you like this design. I thought it turned out pretty.  Well I'm glad I chose to do this challenge in the end <3

xx Karen

Next...
Day 30 - A pedicure *gasp!*

Monday, 14 May 2012

Gradient Nails My New Thing!

Yes yes, gradients aren't new, but I've just rediscovered them! and I'm loving this one.  Just had to keep looking at my nails to check they were actually mine, couldn't believe it.

This is the second time I have ever tried my hand at sponging technique to create a gradient affect.  My first attempt was oookkkaaayyy but knew I could do better.  So I was determined to sharpen my technique and get a better result. 

So with the help of the Internet I came across a blog that offered a fantastic pictorial tutorial by the lovely Sammy from The Nailasaurus, I gave it another shot and I'm not looking back.  I skipped Step3, but I think Step5 is the most critical step.  Moving the sponge back and forth is what makes the gradient come to life.

Gradient's are affective and so easily to achieve (now that I know how to do it properly).

Here's my latest combination using OPI's A Grape Fit! and a generic black polish I bought from sportsgirl (I think).  I always use OPI Base and Top Coat's.


Hope you liked this and leave a comment below on how you went trying this gradient technique yourself.  I'd love to know what colour combinations you come up with :)

xx Karen

Tuesday, 8 May 2012

Warm Autumn Gradent Mani with Feather Stamps

This look seems to be coming back into popularity at the moment, the Gradient Manicure.  And the best part it's actually really easy and hard to stuff it up! Honestly this was my first attempt at a gradient manicure and as you can see for yourself, it still worked out first time.

I did this mani a while ago, but seeing as i haven't got a video to post up I can only show you in pictures.  Sorry guys, I really want to get into video tutorials, and hopefully I'll recreate another gradient soon and upload a Video Tute.

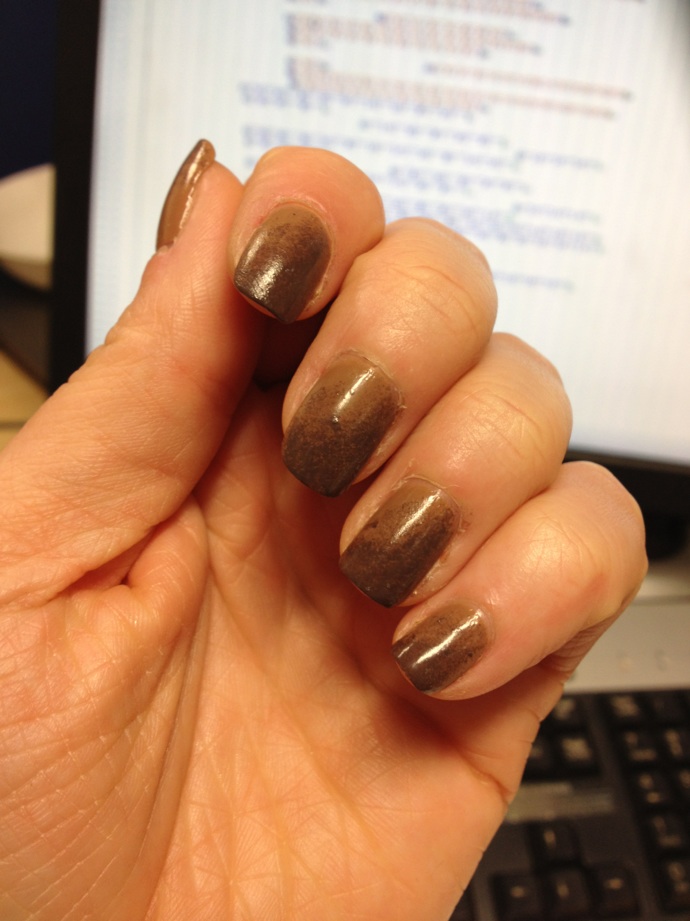
Here are the pictures of the Gradient affect on it's own.
I used 2 coats of OPI San-Tan-Tonio as the base colour, then using a makeup sponge, dabbed on a gradient starting from one corner and working out diagonally with OPI's You Don't Know Jacques.


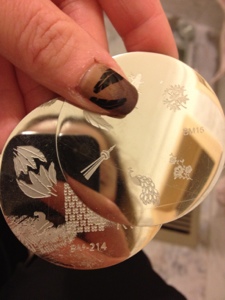
The next day I added my finishing touches using Bundle Monster Image Plates BM15 & BM214


Of course apply Top Coat to seal and protect your manicure.  I used OPI Top Coat and OPI Natural Base Coat to begin with.

Thanks for looking, hope you like this manicure and try it yourself (",)

xx Karen 

Bundle Monster Release 3rd Set of Image Plates - Contest

Hello my friends

I've entered a Bundle Monster Stamping Plate Giveaway contest (my first).  It's not just any giveaway, 25 lucky winners will win Bundle Monsters New Image Plates! (their third series) So it's really obvious I really really like to win them.

Entries to the contest to itself have closed, however the public voting have now opened SO START VOTING! (for me preferably). 

Voting will close on Sunday May 14th, the top 50 manicures with the most votes will got through to the next round where judges will decide on 25 of the original 50 who will win the prize (the 3rd series of the Bundle Monster Image Plates. Woot!).


Titled: Spanish Affair
OPI - The Colour to Diner For, image plate BM04
  If you DO have a facebook account, vote here:
http://apps.facebook.com/winnailplates/contests/216667/voteable_entries/49008556

If you DON'T have a facebook account, vote here:
http://promoshq.wildfireapp.com/website/6/contests/216667/voteable_entries/49008556


You can vote as much as you like, however limited to once a day.
Every vote counts and I appreciate every single one!

Wish me luck, I think I'm going to need it, having a quick look at the other entries it's a tough competition, so going to need all the help I can get.  Even to make the top 50 would be fantastic!

For those interested in the colour and stamp used.  The base colour is OPI - Colour To Diner For, the image stamp is from BM04 from the first set of stamping plates.  I used OPI - Alpine Snow and a dotting tool to finish the emelishments.
Hope you like it and give it a go yourself.

xx Karen

Sunday, 29 April 2012

Orange Dutch Day inspired Ruffian Manicure

Happy Koninginnedag!
(Orange Dutch Day)

In honor of Orange Dutch Day (Koninginnedag) I've been inspired to use the colours from OPI Dutch Collection to do a Ruffian Manicure.


I used OPI's Kiss Me On The Tulips (Pink) and A Roll In The Hague (Orange).
Kiss Me On The Tulips (Pink), A Roll In The Hague (Orange)

I'm in the process of trying to put up my first tutorial on YouTube, but it's proving more difficult then I had thought. Need some better equipment and video editing tools, any suggestions what programs are easiest to use and and easy to obtain.


Mmmm... stroopwaffles. YUM!