Showing posts with label Review. Show all posts

Saturday, 31 October 2015

Halloween with Jamberry Nails [Sample]

Hope you're all having a great Halloween!

My lovely friend Lisa from Jamberry nails gave me these cute little mummy inspired nail wraps to review.  And these little critters are just perfect for this Halloween Holiday.  And they're super easy to apply!


These limited edition nail wraps are called All Wrapped Up and are part of the Holiday Collection (buy here)

Just when these Jamberry Nails couldn't get cuter, they glow in the dark too!!


If you'd like to host a party, Lisa is an amazing consultant and would love to help you and some of your friends have a fun night.  Lisa is based in a northern suburb of Melbourne, Australia.  

If you're interested or have some question you'd like to ask Lisa, you can contact her via her Jamberry Site at BerryStylish1.  Or why not take a browse through her online shop.


Hope you're all getting spooked out and enjoying all your naughty treats.  
Happy Halloween.


Sunday, 28 June 2015

piCture pOlish - LakoDom & Liquid Palisade Review

Hi Everyone 

PicturePolish has done it again with a gorgeous speckled nude.  First there was PicturePolish Cherish and then they brought out PicturePolish LakoDom.  If any of you follow me, you would notices that I like neutrals and these suit me to a tea.  AND they have a tiny bit of shiny speckle to make them just even more special and unique (PicturePolish have a great range of these types of polishes).


I decided to stick to the grey theme and a while a go I was given PicturePolish PMT from PicturePolish as a bonus in one of my orders.  I love the name and it stamped really nicely over PicturePolish LakoDom.


Ingredients Used
  • Base Coat1: Orly Bonder
  • Base Coat2: OPI Ridge Filler 
  • Base Colour: PicturePolish LakoDom
  • Stamping Polish: PicturePolish PMT
  • Stamping Plate: Pueen26
  • Top Coat: Poshé


I also purchased PicturePolish Liquid Palisade, which is a liquid latex.  When I first saw other girls using it on YouTube, I saw another breakthrough in Nail Art and had to have it! It makes clean up so much easier and quicker.  It does take a little patience to put on, but it's worth it.  And while it's drying I used that time to apply my base colour.

After doing some research on the web, I decided to purchase this because it was coloured and you can see when it's dry.  Not to mention it peels off really well.  So i give PicturePolishes Liquid Palisade a big Thumbs Up! 


Thanks for stopping by

Saturday, 16 August 2014

Incoco Nail Strips - Cloud Nine French Tip

Hello Nailistas!

I'm sure you know of this product already, but I hadn't tried them yet and I wanted to see what the hype was all about.  I have to admit I'm a fan!

What I like most about the Incoco Nail Strips is that they're made with actual nail polish.  I think this is what makes them stand out from the rest of the competition.

I've used other nail strips, but they tend to crack, rip, bubble, or just don't fit my nails.  The best part about Incoco Nail strips is the fact they are made from 100% real nail polish, so this makes them more pliable. You can stretch them (not too much, they too will rip if stretched too far) and pull them into shape and the end result is a professional looking finish.

I was in the market for some french tips for my upcoming wedding. I personally find it laborious to do French manicures.  So was really interested to see how Incoco French Tips stacked up.  I was so impressed how simple these were to apply, and perfect every time! This is part due to the fact you can pull them into the right position so easily.

For a first timer to Incoco Nail Strips, I am now an absolute fan!

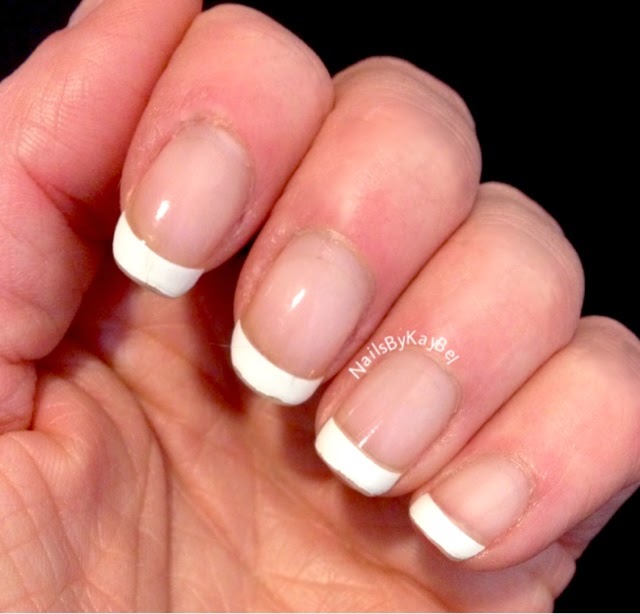
I have pictured below my end results using French Tips in Cloud Nine.  I wasn't too sure what colours i was ordering on the online shop, perhaps if they used real photos, they would give buyers and better indication of the colours you are getting.  Cloud Nine is essentially a clear top colour over a white French tip. 


Incoco claim that their nail strips last up to 14 days... like many I see this and then pfft. yeah right...


After 7 Days... 

It's been exactly one week, and below are picture of my nails.  Let me tell you, these nail strips just keep blowing my mind.  If I was to paint my nails with a French Manicure the old fashioned way, they would have already peeled off from the edges after just the 2nd day (tops!), this also includes using stamping french nail tips too.   

Below are pictures after 7 days! and I'm going to persist to keep them for another 7, I will update this post next week.  I'm dying to know how they last after 14 days, and I think they have the stamina to do it without any issue.


It's been 7 days and we don't have a dish washing machine (that'd be me) and they look amazing still.


I've really tried to highlight in the picture below the wear on the tips... but as you can see it's so minimal.  I can't stop looking at my nails :)  I've never had a French Manicure on my nails look this good for this long!!


Needless to say I've made another order for another batch of French Tips and some other colours.  Incoco also sell the French Tips on their own, so I'm curious to know how they will survive under a coat of regular nail polish and top coat.  If you are interested, let me know in the comments below and I'll make sure to make a post on that too.

Make sure to come back soon, I will post up photos after 14days soon.

I just wish the postage to Australia wasn't so expensive :(

After 14 Days...

Ok, I finally got there! Let me say it wasn't easy, have you tried to keep the same manicure longer than a week?!? it's hard.  Especially if you're like me and like to change your nails every couple of days! That's mostly because the polish chips and my OCD kicks in and need to re-do my manicure. But these nail strips didn't do that, and I think that's what impressed me the most.

Anyway as promised here is the result after 14 days.  Not any more wear than after 7 days.  These babies just kept impressing me.  And to be honest all they needed was a quick file to remove the wear on the tips and they would have been right to keep going.


xx Karen

Monday, 21 April 2014

Epic Nail - Nail Transfer Foils Review


Hello lovelies,

I'm excited to be back with another review.  Not just to share with you these amazing nail product, but I've just come back from a holiday in Italy. Going away always makes me appreciate home, and I sadly realised how much I missed my nail polishes!! I limited myself to just two colours while I was away. I think that was very restrained of me.

Anyway... Back to the review...

I have had yet another opportunity to do a review for Epic Nail, this time transfer foils.


So here is the end result. This is All Laced Up,  I used a base coat of ColorClub Worth The Risque. 
Each Roll of foil is 4cm x 100cm.  Comes packed with a cardboard inner and a transparent hard plastic storage tube.  Epic Nail have some pretty awesome kits or foil packs which come with the glue you need and 6 different foil designs which in my opinion is good value for money.  Or you could just get a single roll. Also have look at their shellacs, I did a review a little while ago (here). 

Epic Nail regularly have specials so it is worth subscribing to their email list.

All Laced Up
(buy online here)


To be honest, at first I didn't like foils, it's true.  I couldn't quite work out if it was actually as difficult as I was finding it be OR I just wasn't getting it.  I had almost given up trying after many failed attempts.  Sometimes it's best to put things aside and come back to it when you're ready, I'd had enough for one day and I wasn't getting anywhere anyway.


Weeks past and I saw a fellow nail art YouTube-r I follow [Miss80Million], she made transferring the foils look so easy and I was inspired to try once again.  Her video was a basic introduction to transferring foils, this is where I needed to pick up from where I had last left off.  I needed to go right back to step one.

So I did some more research about common problems others faced when using transfer foils. I was relieved knowing I wasn't alone!  I will also note here, I'm still trying to grow the courage to attempt marbling once more...

So watching Miss80Million's video gave me the motivation to try again. And they worked! It actually worked! By the end of it I was doing two even three fingers at a time. The biggest tip I learnt was to WAIT. At least 5-10mins for the glue to dry before applying the transfer foil. 


Tips & Lessons Learnt:
In no particular order of importance, here is a list of things I discovered myself and also from what learnt from others in my search.
  1. Use a base colour - Needs to be completely dry
    Choose a colour that closely matches the foil.  Because the foil may not cover the entire nail perfectly, this covers up any untidy edges.  One coat is probably all you need.  Think of it as a clean edge manicure insurance policy.

  2. Patience, you need to WAIT!!!
    Some packages say to wait 3mins or until the glue "goes clear".  This is what I did first time... and it never worked. I found many other nail enthusiast said to wait, and then wait some more, sometimes up to 15mins.  And they were right girls and boys.  I painted 2 nails, watched some TV then came back about 10mins later and it worked.  This was my breakthrough moment!
  3. Use a Cotton-Bud (or Q-Tip)
    Orange sticks could pierce the plastic sheet of the transfer foil.  Or you could use your fingers, but you seem to get more even pressure and control using a Cotton-Bud to smooth out the bumps and bubbles.
  4. Place carefully
    Take the time to place the foil properly (remember there is no rush, the glue will be better the longer you wait anyway).  Once the foil touches your nail, you can't 
    re-position it! This can be an issue if the foil is a pattern.
  5. Don't forget Top Coat!
    It's so important to seal in the foil, not only makes it last longer, but it's so pretty and shinny too.

    As a suggestion, perhaps apply a fast drying top coat after your base colour, just in case you stuff it up.  With nail polish remover you can remove the foil layer without damaging your base underneath.  This way you save yourself painting you nails from scratch again, and attempt to re-foil (take-two).

The finished results I think are amazing. I was too embarrassed to take pictures of my first attempts, but in reflection I should have, just so I can show you what a big difference following these handy tips made.


Have you tried foils before? What was your first experience like? What do you find helped? 


xx Karen xx


Saturday, 1 February 2014

Epic Nail - Shellac Nail Polish Review + Readers Discount Code

Hello My Lovely Readers,

I have the pleasure to provide you a review for a wonderful shellac nail polish from Epic Nail.

I was approached by Epic Nail to review their new Foils range (also to come very shortly).  I was fortunate that I've purchased products from EpicNail online already, so you see ladies, I already know how wonderful these products are.  I asked if I could review their shellacs as well and they did more than accommodated my request.

I have a coupon for my wonderful readers FREE Shipping on all orders with a product total over $30.00 (this includes purchases on any polishes, foils, kits and accessories). To redeem this offer you will need to enter BLOGKAYBEL into the coupon code box prior to checkout.


Shellacs polishes are very affordable (without compromising quality) for only $9.99 and they have kits that are great value.

If you don't think they're not fabulous enough yet, every order goes in to the draw to win a Mini iPad every month! and they constantly have specials, subscribe to stay updated.


- The Review - 
Below I have swatched Wicked, a gorgeous classic red.  I used my own UV curing lamp. Base Coat and Top Coat were also provided by EpicNail.  


Below is after one week of wear.  Besides the usual regrowth these beauties looked just as gorgeous and bright as the first day I painted my nails.


Thank you for stopping by.  Hope you take a look at Epic Nail see their range of shellacs, foil, kits and accessories for all your manicure and pedicure needs and especially take advantage of their specials offers.  

Don't forget to use my special coupon code at checkout if your order is over $30. 
BLOGKAYBEL


Tuesday, 19 June 2012

Seche Vite - Review

Seche Vite - Where have you been all my life?!?!?


I have to admit, I'm a damn harsh critic deep down, particularly when it comes to trying something new, but something made me want to really try this Seche Vite all these girls have been raving about on YouTube and other blogs. So...

What's so good about it? ...

I finally bought a couple of bottles on eBay, it was a bargain buy.  Decided if I didn't like it I was going to give the second bottle away, that's IF it didn't find it lived up to the high expectations. 


I can't believe how surprised I was when I used it for the first time! To say I was amazed is an understatement.

I was blown away!! 

It exceeded all my expectations!! 

This stuff is truly great!! 

I can't believe I waited this long to give it a go.  Yes, I am a devoted OPI girl, but I have to admit, I will now take a second thought next time before grabbing my OPI top coat.


I can't recommend this top coat enough to all my friends, like me, that don't have the time to wait for nail polish to dry enough so that it doesn't smudge or worse, ruin your nail art or manicure which took a lot of effort and time to perfect.
Not only does it dry super fast it is great for
applying on top of stamping, no streaks.

It literally is dry in less than 2mins (can comb fingers through hair) and hard enough to knock around in 15 (for example pick up a bunch of car keys and not worry about getting dints) and completely hard as a rock in under 30mins!.  What would normally take hours with to become as hard as a rock, only takes Seche Vite less than 30mins!  

 "This is particularly good when I do friends and clients nails,
because it drys so fast and I have the confidence
their manicure will survive past the front door."

I do have some concerns about Seche Vite (this is the little critic inside me rearing it's ugly head). I was a little overwhelmed by the smell, it is very chemical intensive.  I don't know what exactly goes into this little miracle bottle, but whatever it is (should probably look further into this) it works wonders. 

So the critic and health warrior inside me does get concerned every time I go to put on a layer of Seche Vite. 

The chemical aroma
is VERY strong...

       and my natural reaction is telling me that something that smells that strong CANNOT be good for you. Do you agree? So to be on the cautious side, I've decided to use Seche Vite on myself sparingly, or only when necessary.  For example when I don't have the time to wait for my nails to harden up enough, for example like just before bed or a lazy Sunday afternoon. 

Do you have any thoughts on Seche Vite or personal experiences you'd like to share, good or bad?  Have you tried any of the other Seche Vite products? What are your thoughts on these and would you recommend any of them?


xx Karen