Thursday, 28 June 2012

Summer Challenge Day 19 - Ice Cream Sundae

I know this is late... I really need to get on top of these Summer Challenges.

Here's my Ice Cream Sundae,  I tried to capture the waffle cone and then added a white "ice cream" tip to an accent nail.  I was happy up to this point.  Then I thought I'd be creative, this is where the alarm bells should have started going off! used OPI Rainbow connection to add like colour sprinkles to my ice cream.  I didn't know whether I wanted to laugh or cry.  Now looking back, it's all a bit of fun, so laughing all the way.

For this design I used:
OPI San Tan-tonio for the base colour,
OPI I Brake for Manicures to stamp image from Konad image plate m65.
OPI Alpine Snow on my accent nail (ring finger) then "sprinkled" with OPI Rainbow Connection.

xx Karen


And this is where is all went down hill... LOL


Next...

Tuesday, 26 June 2012

Summer Challenge day 18 - Ballooning or Kites

Here is my Summer Challenge for Day 18 - Ballooning or Kites.

I chose to do kites because I remember as a little girl over summer, my brother and I would play with our kites on the beach near our summer holiday house.  My kite was green and had a mouse on it, my brothers was blue and had a racing car.  That's how clear and wonderful my memories are from when I was little girl.  I'll definitly be taking my little girls (when i have children that is) to do the same thing one day. xx

I appologise for my discuting cuticles.  

I used two coats of Maybelline mini colorama in Party Blue (#96) stamped clouds from Konad image plate m79.  The kite I painted with a detail brush and acrylic paints.


Next...


See you next time
xx Karen

New 2012 Bundle Monsters Arrived!!

I'm VERY excited to announce that today I recieved the new 2012 series of Bundle Monster Image Plates from BundleMonster.com

I haven't gone through and taken a picture of every plate.  But if you would like me to do this, please leave a comment below and i'll be more than happy to do this.  I'm also at work at the moment (literally just recieved them!) so can't spend too much time here taking heaps of photos then cropping them and uploading... you get the idea.  So will most likely do a proper review later.

There are 25pc in total.  And I was so excited I haven't even taken off the blue protective sheat, sorry about that.


So since I am currently at work, I took a few quick photo's of some of the plates I instantly fell in love with and some of the ideas and observations that popped into my head. 

For example I love the idea of providing negatives of some designs seen in the images below.


Below are a few which I've picked out as some of my first favourites already, so you'll be definitly seeing these in the very near future...

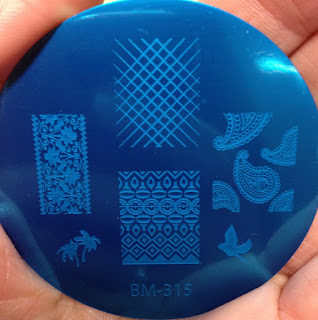
I saw a sneak peek of this plate (BM-315) and I instantly fell in love with the paisley design on the right.


I absolutely LOVE the bottom floral design on image plate BM-314.  Think this would frame an accent nail beautifully. Almost reminds me of a painting, but it'll be on you nail :)


I was (still am) a big fan of newspaper nail art and I also a sneak peek of this image plate as well (BM-311) I love the calligragphy at the top of the plate.


Another image plate seen in a sneak peek... now gradients are a big thing at the moment so was curious how the gradient on the next image plate (BM-301) will look, to the right of the plate.  Probably not as nice a finish as sponging would do, but still I'm curious, will need to do a test and put something on the blog.


I really liked the idea of the following two.  One which has th ribbons, which I can see coming in handy on awareness days (eg, pink ribbon for breast cancer awareness).  Also love the heart themes of the second plate.


Well I don't know about you, but i'm dying to get home and play with these!!  This will have to do for now, must get back to work... :P

Have you got yours yet?

Again here is where i got mine from on BundleMonster.com

See you next time
xx Karen


Wednesday, 20 June 2012

Summer Challenge Day 17 - Hippie Retro SummerLove


This was a lot of fun.  I was happy with the result, because it was exactly what i had in mind (don't get that confused with happy with the actual overall look, I definitely need to brush up on my technique) and please forgive me, the cuticles weren't cleaned up properly.  I was at my mums when i did this manicure and didn't have my paint brushes to clean around the cuticles properly.  They got very messy from all the stamping and only had cotton-tips.

But here is the end result anyway.


Again here is the before and after the stamping exercise... oh my!

 
At first I was keeping it simple. Was really liking the simplicity of this up til here and was toying with the idea of slapping on the top coat and calling it day.


How about some cute smileys :)


And last one


Colours Used from Left to Right:
Revlon Red
OPI - On The Same Paige
Sally Hansen - Yellow Kitty
OPI - Suzi Says Feng Shui
Generic Purple (it was promo freebie, no name)
OPI - Alpine Snow (used this as a base to stamp on)

I also didn't have a green nail polish bright enough for a rainbow so mixed the yellow and blue polishes listed here.

Image Plates Used:
BM07 (peace symbol)
RA-117 (Smileys)
Thanks for having a look. I thought this was a really fun design.  I like to hear your comments, so leave a comment below.

Next...

See you next time  

xx Karen

Tuesday, 19 June 2012

Summer Challenge Day 16 - LadyBird

I present to you...

The Ladybug? or Ladybird :P


Personally this is one of my favourite reds - OPI's Vodka & Caviar, I used two coats of this.  And on my on my ring finger I used two coats of Ulta3 in Lagoon (picture below).


I used Konad Image Plate m79 (the dots), Bundle Monster Image plates BM13 (the lady bug) & BM19 (the leafy background) for the ring finger.  I used Seche Vite for my top top.


And that's it.  I was disappointed the ladybug didn't turn out the way I'd hoped. It was a stamp! how could I possible get that wrong!? well I did, and it's there, just looks very dark in the photo's.  On the brighter side I did like the other nails, they turned out well :)

So let me know what you think. 

Next ...
(I'm not generally a rainbow fan, but this was fun)


See you next time.
xx Karen

Seche Vite - Review

Seche Vite - Where have you been all my life?!?!?


I have to admit, I'm a damn harsh critic deep down, particularly when it comes to trying something new, but something made me want to really try this Seche Vite all these girls have been raving about on YouTube and other blogs. So...

What's so good about it? ...

I finally bought a couple of bottles on eBay, it was a bargain buy.  Decided if I didn't like it I was going to give the second bottle away, that's IF it didn't find it lived up to the high expectations. 


I can't believe how surprised I was when I used it for the first time! To say I was amazed is an understatement.

I was blown away!! 

It exceeded all my expectations!! 

This stuff is truly great!! 

I can't believe I waited this long to give it a go.  Yes, I am a devoted OPI girl, but I have to admit, I will now take a second thought next time before grabbing my OPI top coat.


I can't recommend this top coat enough to all my friends, like me, that don't have the time to wait for nail polish to dry enough so that it doesn't smudge or worse, ruin your nail art or manicure which took a lot of effort and time to perfect.
Not only does it dry super fast it is great for
applying on top of stamping, no streaks.

It literally is dry in less than 2mins (can comb fingers through hair) and hard enough to knock around in 15 (for example pick up a bunch of car keys and not worry about getting dints) and completely hard as a rock in under 30mins!.  What would normally take hours with to become as hard as a rock, only takes Seche Vite less than 30mins!  

 "This is particularly good when I do friends and clients nails,
because it drys so fast and I have the confidence
their manicure will survive past the front door."

I do have some concerns about Seche Vite (this is the little critic inside me rearing it's ugly head). I was a little overwhelmed by the smell, it is very chemical intensive.  I don't know what exactly goes into this little miracle bottle, but whatever it is (should probably look further into this) it works wonders. 

So the critic and health warrior inside me does get concerned every time I go to put on a layer of Seche Vite. 

The chemical aroma
is VERY strong...

       and my natural reaction is telling me that something that smells that strong CANNOT be good for you. Do you agree? So to be on the cautious side, I've decided to use Seche Vite on myself sparingly, or only when necessary.  For example when I don't have the time to wait for my nails to harden up enough, for example like just before bed or a lazy Sunday afternoon. 

Do you have any thoughts on Seche Vite or personal experiences you'd like to share, good or bad?  Have you tried any of the other Seche Vite products? What are your thoughts on these and would you recommend any of them?


xx Karen

Monday, 18 June 2012

Summer Challenge Day 15 - Hot Pink (freestyle) / Luis Vuitton Nails!

What's more hotter than Luis Vuitton Nails?!?


I just got these images plates and was quite excited to use them.  I got them from this blog sale, and the price I paid for these plates, they're pretty good value and there's a great variety to choose from and some especially cute characters.  check it out here.


Starting with two coats of OPI's Kiss Me On The Tulips, I stamped OB39 the Luis Vuitton pattern. Done, and after my last design I really enjoyed doing a nice simple one. 


Next...
(Ladybird?)

xx Karen

Sunday, 17 June 2012

Summer Challenge Day 14 - Gardening

Hey there again, time for some gardening!

I had a lot of fun putting this one together.  Used a lot of my image plates, it was a great opportunity to use a lot of plates I have used yet :)

Tell me what you think of what I came up with:


For the base I used Maybelline Mini Colorama in Party Blue then started stamping.  Starting with the clouds on Konad m79, the grass from Red Angel plate RA-105, the flowers on Bundlemonster BM205 (they're there just a very faint pink) and then finished with butterflies from Konad m36.  That's all.


Let me know what you think.


Next...

xx Karen

Friday, 15 June 2012

Summer Challenge Day 13 - Summer Fete

Wow... I tried a new technique that's been floating around lately.  Have you heard of Sugar Spun?

I first saw this technique by xoxoalexisleigh and she has a really good YouTube tutorial, however I don't think my nails turned out quite as nice.

The idea behind this design is Fairy Floss, because whenever I thinking of Summer Fete's, I think of the Pink Fairy Floss machine :)

Try not to look too close, and it makes me feel better if you squint your eyes, so the pictures blurry... here's the end result:


Colours I used for this design were:

Sally Hansen Yellow Kitty and
Ulta3 bo peep (which I picked up for $2 at the post office shop)

I chose not to put top coat on, because even the end result was a disaster, i like the 3D affect.


It was sure interesting trying to learn the new technique and I found it did waste a lot of polish (hence why i went for a cheaper pink), my first attempt I used OPI's Kiss Me on The Tulips, that was even worse (can you imagine!) and so reached for a cheaper bottle on my second attempt.

Well i hope it wasn't too difficult to look at. Let me know how you've tried this technique and what you think of it.

Next...
(had a lot fun with this one, lotsa stamping :D )


see you next time :)

xx Karen

Wednesday, 13 June 2012

Summer Challenge Day 12 - Hot Hot Hot Combo

Hi Everyone,

Hope you having a great day and enjoying this challenge as much as me.  I was actually looking forward to this one.  Saw this in the list and instantly knew what I wanted to do.  It had to have flames I thought, and colours of a hot summer.  Summers are generally so hot here in Australia it burns, literally. I don't remember a summer I haven't got sunburnt yet.


Colours I used for this design were Sally Hansen Yellow Kitten (2 coats), OPI's A Roll In The Hague and Revlon Red.  The Image was using Bundle Monster Image Plate BM12 and using Konad Stamping Black Polish.  I always use OPI Base Coat (Nail Envy Matte) and OPI Top Coat.


After my last attempt of a three tone gradient, I needed to improve my technique, think I did something right this time around.


Next time...

Hope you like and looking forward to seeing your designs.

xx Karen

Tuesday, 12 June 2012

Summer Challenge Day 11 - Pink + Blue

I was sitting down and pumping these out the other night and was so delighted to be back on track again.  I can't believe how much fun I'm having from doing this challenge (can you tell it's my first).  Perhaps the further down the challenge I get, might curb my enthusiasm, but right now at this instant I'm loving it.

So much that I got a bit carried away with this one.  Did one design and thought I can do something more.  I should have stuck to the first design and left it at that :P

The first design with hand painted French Tips:


On now for the second attempt, I thought I'd try a sponge gradient. Didn't quiet work out the way I planned ...


Colours I used were: OPI's No Room For The Blues, Kiss Me On The Tulips and My Boyfriend Scales Walls for the base of the sponging.


Next...

 See you next time

xx Karen